Table of Contents Back Previous Next Logo

Analysing Achievement Data > Configuring the Query Definition
Configuring the Query Definition
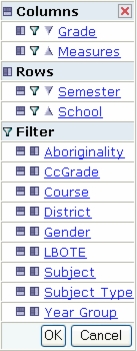
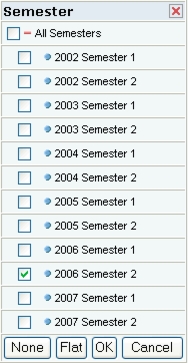
After you have selected a predefined query and viewed the results, you can then further configure the query, using the Mondrian OLAP Navigator, to produce a more detailed set of results.
Figure 10: The OLAP Navigator
The OLAP Navigator enables you to manipulate the query results in a number of ways to produce more extensive and detailed results. The Navigator is divided into three areas:
Columns - This group shows the data that is displayed in the columns of the query results. There must be at least one entry under Columns.
Rows - This group shows the data that is displayed in the rows of the query results. There must be at least one entry under Rows.
Filters - This group shows all of the other available data categories that can be:
added to the Columns or Rows groups to extend the data displayed on that axis.
The following table identifies the icons and buttons displayed within the OLAP Navigator, and explains how to use them.
Column - Click this icon, next to a data set name, to move the data set into the Column group.
Row - Click this icon, next to a data set name, to move the data set into the Row group.
Filter - Click this icon, next to a data set name, to move the data set into the Filter group.
Demote - Click to demote (move down) a data set within the Column or Row groups.
Promote - Click to promote (move up) a data set within the Column or Row groups.
OK Button - When you have completed configuring the query using the OLAP Navigator, clicking OK will close the Navigator and run the new query. The results table is redisplayed based on the new query.
Cancel Button - Cancels the current operation (filter or query definition). Returns you to the previous screen.
Close - Cancels the current operation (filter or query definition). Returns you to the previous screen.
Select and Deselect - When editing a Column or Row definition, can be clicked to Select (blue circle) or Deselect (red circle) a data set. Once selected, the data set can be moved within the list using the Paste after and Paste before icons.
Paste after - Moves the selected data set (see Select icon above) to the position immediately after the data set that is adjacent to the clicked icon.
Paste before - Moves the selected data set (see Select icon above) to the position immediately before the data set that is adjacent to the clicked icon.
Expand and Collapse - Where data sets are displayed as a tree of sets and subsets, these icons can be used to Expand (plus icon) or Collapse (minus icon) a set.
Group and Flat Buttons - Some data sets have been organised into predefined groups and sub-groups.
None or All Buttons - Enables you to select None or All checkboxes when configuring Column or Row data sets.
Table 11: OLAP Navigator Icons and Buttons
To configure a query definition:
Click the Open OLAP Navigator button on the Mondrian toolbar.
The OLAP Navigator is displayed above the query results.
If required, use the Column, Row and Filter icons to reorganise the data sets within the three groups.
Use the icons and buttons provided to select or re-order data within the set.
The OLAP Navigator is displayed. Repeat for other data sets as required.
Click OK on the OLAP Navigator panel.
The OLAP Navigator closes and the query is updated. The results table is redisplayed to provide the new query results.

Table of Contents Back Previous Next
http://www.eddept.wa.edu.au
Tel: (08) 9264 4111
(08) 9264 5005
websupport@det.wa.edu.au